Age of empires 2 Max Performance on Windows 10
Throughout this guide, I will help you maximize the performance of age of empires 2 on windows 10. This will also help fix random and constant freezes, mouse lag that may occur during the multiplayer gameplay or a streaming session.
I- Voobly Client Setup:
Make Age of Empires 2 runs at the top performance possible. This is also going to solve game settings that do not save after you change them like (hotkeys, map settings, profile etc.)
Login to Voobly Client > Enter a Lobby> Host a room
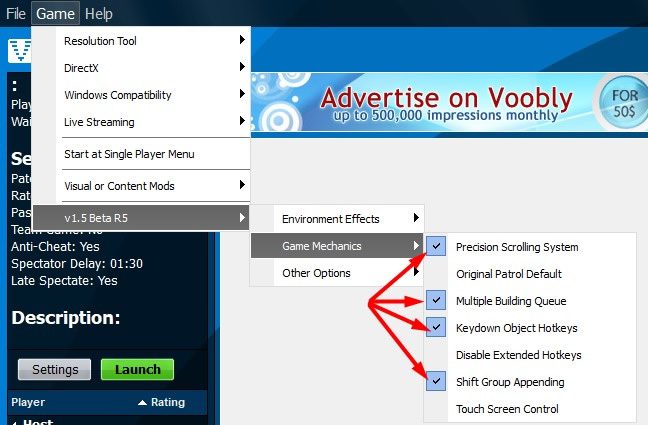
And apply these settings
Userpatch 1.5RC Voobly Room Settings
Thanks to Userpatch team Age of Empires 2 has gotten so much better in terms of latency and improving your game mechanics. Hereby I introduce you to a screenshot of recommended game room settings (players from steam are highly recommended to apply them)
Precision Scrolling System: Improves cursor precision and potentially fix mouse issues for players from steam.
Multiqueue: Improve your game mechanics by selecting military buildings and clicking a unit hotkey multiple times. Units build synchronically from every building.
Keydown Object Hotkeys: The restore of key-down feature that players on steam are used to.
Shift Group Appending: Improve your game mechanics by avoiding boxing and resetting hotkeys for your units and build. With this feature on. E.g simply hold SHIFT and press key 1. The unit or building will be automatically added to your control group “1”.
Next, On the top menu of the Lobby, click help> Open Voobly Directory
Voobly Installation folder will pop up. Goto \gamedata\aoc\ folder >
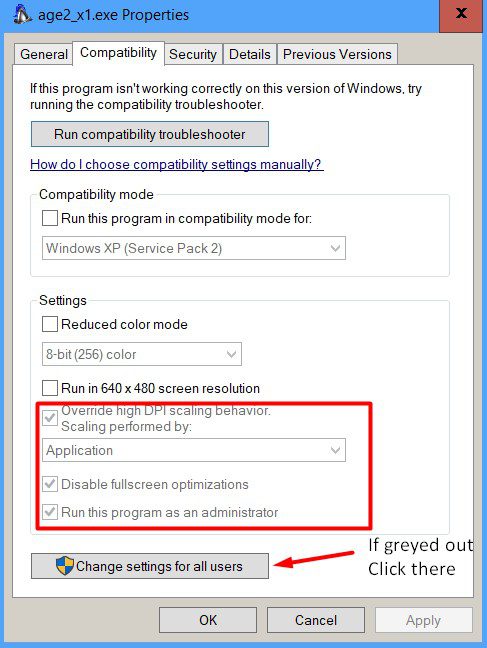
Find age2_x1.exe > right click it > properties
And apply these settings:
In the same folder, there is another folder named \userpatch\:
Inside that folder, you find another “age2_x1.exe” apply the same thing to it as well.
II- Windows 10 Theme & Virtual Ram:
Adjusting the Virtual Ram to boost CPU performance:
Click on Start > File Explorer. Right-click on This PC > Properties > Advanced System Settings >Advanced tab > Performance and then click on the Settings button:
In the Performance Options window, go to Virtual memory section and click on Change:
By default the size of the paging file is being managed by Windows, so the first step is to clear the Automatically manage paging file size for all drives checkbox:
In the image above you can see that I have set a custom size for both my drives to a value that is: 12000 (MB) because I have 6 Gb of Ram and basically the rule of thumb says that you should make your virtual ram to twice the size of your real Ram.
Example:
If you have 2 Gb of Ram which is 2000 (MB) Then your virtual ram should be 2000×2= 4000 => So 4000 is the value you need to set per each drive.
Use Windows 10 Classic Theme to Free up Memory Usage
1. Press Win+R keys together to launch RUN dialog box. Now type sysdm.cpl and press Enter. It’ll open classic System Properties window.
2. Now go to Advanced tab and click on Settings button present under Performance section.
3. It’ll open another window. Now check Adjust for best performance, then click apply and ok.
III- Mouse Input Lag and Annoying Freezes
This part of the tutorial should cover and fix all the mouse lag issues within the multiplayer and singleplayer. Besides that, It will also cover common freezing problems; for instance random freezes, frequent freezes, sudden crashes etc.
Fix Your Laggy Mouse And Improve Its Responsiveness
a- Sound:
Having your sound set to higher bitrate will cause a huge hit to mouse response. Thus, set your bitrate to 16bit 44.1k. (Or if you don’t use a microphone disable it for better results.)
Right-click the sound icon in the taskbar.
Click Properties >
Go to Advanced Tab >
And make sure to set it at 16 bit, 44100Hz
b- Nvidia Users Only
This is what your Nvidia control panel should look like. Anti-aliasing does add latency, so I force it off. Texture filtering is going to occur regardless, so it doesn’t really matter to what you set your anisotropic filtering.
To reduce the hit on your graphics card, let’s enable No scaling mode.
Leaving scaling on anything else incurs a large amount of input lag, even in native resolution. “GPU – No scaling” is also much laggier than the “Display – No Scaling” setting. This is bad because if you plug in a Korean IPS panel or any panel in with no hardware scaler, it forces you to use the extremely laggy “GPU – No Scaling” mode.
Disabling Useless Services And Built-in Features
c- Services That Affect Mouse, Gameplay And Also Computer Performance
This part is very important. It will reduce massive memory usage and surely this should fix your 100% memory usage at the task manager.
First of all, let’s run the services panel: Click Windows button + R and type in services.msc
A window will show up containing a long list of services. Right-click every service mentioned below and make sure to set the Startup type to disabled and click the stop button as in the example below as well.
Here are the services you need to disable and stop:
Diagnostics Tracking Service – Disable Geolocation Service – Disable Dmwappushsvc – Disable (related to the keylogging ability of win10) Network connection broker – disable (I believe this service had a dependency in Win 8.1 where it was more difficult to get rid of) Tile data model server – disable – If unable to disable it, Click Windows button + R , type in regedit and do the following (hkey_local_machine > system > currentcontrolset > services > tiledatamodelsvc – Set “start” key to 4 to disable
Adobe Acrobat Update Service – disable ( some of you may not find it in that case skip to the next service) Windows Error Reporting service – disable Background intelligent transfer service – this usually stayed off when set to manual on Win 8.1, but Win10 wants to keep it on all the time so if you disable it, you will have to re-enable to run Windows update
Themes – disable (This will disable windows themes service)
Windows Defender– disable
Windows Search– disable
Windows Update– disable
Print Spooler– disable (Do not disable if you have a printer)
Disable Useless Windows Features
Disabling some of the pointless windows 10 features will reduce system space that is usually from 700 – 1000 MB to all the way down to less than 600 MB.
Go to the control panel > programs and features > “Turn Windows Features On/Off” and uninstall the following until the menu looks like this:
– Internet Explorer 11 – first turn off smooth scrolling in the options menu of IE, then turn off automatic updating under the “about” section of IE.
– Print and document services (in you don’t use one)
– SMB 1.0/CIFS file sharing support
– Windows Location Provider
– Work folders client
– XPS services
– XPS viewer
Disable Cortana:
There is only one way to disable it and you have to watch this video https://www.youtube.com/watch?v=q8YEbLoux2U
Disable Desktop Gadgets:
Type gpedit.msc in the run box
Go to: Computer Configuration > Administrative Templates > Windows Components > Desktop Gadgets Set “Turn off Desktop Gadgets” to “Enabled”
Disable Windows Defender:
Type gpedit.msc in the run box
Go to: Computer Configuration > Administrative Templates > Windows Components > Windows Defender Set “Turn off Windows Defender” to “Enabled”
Disable Windows Automatic Updates:
Type gpedit.msc in the run box
Go to: Computer Configuration > Administrative Templates > Windows Components > Windows Update Select “Configure Automatic Updates” and set to “Disabled”.
Disable Windows Error Reporting:
Type gpedit.msc in the run box
Go to: Computer Configuration > Administrative Templates > Windows Components > Windows Error Reporting Set “Disable Windows Error Reporting” to “Enabled” Just in case, you might also want to change the same setting under: User Configuration > Administrative Templates > Windows Components > Windows Error Reporting
Remove Uninstallable metro apps:
Open powershell as administrator and use the following commands:
Remove Windows Store:
Get-AppxPackage *windowsstore* | Remove-AppxPackage
Remove Camera:
Get-AppxPackage *camera* | Remove-AppxPackage
Remove Mail & Calendar:
Get-AppxPackage *communi* | Remove-AppxPackage
Remove News, Sports, Weather:
Get-AppxPackage *bing* | Remove-AppxPackage
Remove Groove and TV:
Get-AppxPackage *zune* | Remove-AppxPackage
Remove People:
Get-AppxPackage *people* | Remove-AppxPackage
Remove Phone:
Get-AppxPackage *phone* | Remove-AppxPackage
Remove Voice Recorder:
Get-AppxPackage *soundrec* | Remove-AppxPackage
Remove Xbox:
Get-AppxPackage *xbox* | Remove-AppxPackage
Remove Maps:
Get-AppxPackage *map* | Remove-AppxPackage
Remove OneNote:
Get-AppxPackage *onenote* | Remove-AppxPackage
Remove Alarm:
Get-AppxPackage *alarm* | Remove-AppxPackage
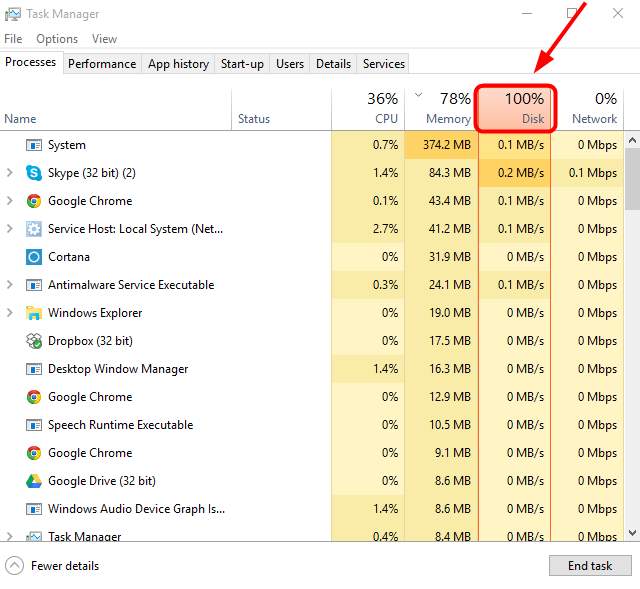
100% Disk Usage Fix For Windows 10/8.1
This is caused by a common combination of Skype as well as Google Chrome. Similar issue with other programs/Antivirus could also cause 100% disk usage. To fix this do the following:
Google Chrome:
In Google Chrome, go to Settings > Show Advanced Settings … > Privacy > Prefetch resources to load pages more quickly
and untick it. See below:
100% Disk Usage Resulted From An Antivirus or Another Program
Now Let me show you the trick to fix the 100% usage. If you would like to know why that happens?! It is because the program does not have write permission, so it keeps attempting to write over and over, causing the disk to overload. To fix It is quick easy:
For programs that are not Antivirus, simply run the task manager
In this example, Skype is causing the 100% disk usage.
Now I am going right click “Skype (32bit)(2)” then click “Properties” and open the “Security” tab.
Click the “Edit” button and then highlight “ALL APPLICATION PACKAGES” and place a tick in the “Write” box.
Click “Apply” and then “OK” and then “OK” again. See below:
Immediately after you apply that the disk usage should drop to 0%. If it doesn’t, do the same thing for other programs that are running.
IV- Update your Drivers & Clean Up Undetectable Adware/Malware/Junk
System & Drivers
You are not allowed to skip this at all. Many of you may not care about outdated drivers in their system; As a result, You are putting your computer at a very high risk of BlueScreen, Low performance, Programs/games crashes, hardware damage, and so on.
So let’s not waste more time and update the drivers now! Download and install Driver Booster 3 (It’s free):https://www.techspot.com/downloads/4842-game-booster.html
(When you run the installer make sure to untick advanced system care, you don’t need that)
Run Driver booster 3 Scan and wait until it’s done and update all the outdated drivers.
Adware, Malware, and Junk
I hate to repeat myself again, but you are not allowed to skip this either xD
Viruses like Adware and Malware are one of the most viruses you never want on your pc. Finding Malware on your PC only means that you are being spied on and your internet accounts, the credit card all can be hacked or used by the malware creator at any moment.
If you don’t have an Antivirus get one soon. Avast Free Antivirus is recommended for even bad computers.
Anyways whether you have an Antivirus now or not. Let’s check if you have any adware, malware, or junk (toolbars, search bar, etc.)
1- Download and run a scan with Malwarebytes: Download Malwarebytes
Run the scan and clean at the end of the scan. Now you can restart your computer.
V-Bonus Tips:
Fix Mouse Double Click
You’ve an annoying right/left double click ? This archive contain 2 programs “MouseFix.exe & FixMouseLMB.exe” try one of them and see what works for you: http://www.mediafire.com/download/1qa6ueqkrgvch39/MouseFix.zip
The archive should be extracted it somewhere in your computer and run as administrator.
Fix loud USB Headset
Your USB headset has 1 or 2 volumes and It is still way too loud.
Download Equalizer APO: http://sourceforge.net/projects/equalizerapo/
After you download you are going to want to run the installer. At some point it will ask you to select which devices you want to use the equalizer on. Select your headphones now.
Let the install finish then reboot.
After you reboot open the file C:\Program Files\EqualizerAPO\config\config.txt, delete the contents and replace it with
Preamp: -12 dB
Unlock Higher Resolution and refresh rate with Nvidia/ATI/AMD!
You probably have tried before to add higher resolutions through Nvidia Panel, but to no avail?! Or you have Nvidia and you would like to extend your screen resolution?!
Yes, It is possible with a patch. But first, allow me to explain the refresh rate. It is the number of times that your screen blinks and displays images per second. Most standard screens have 60 Hz, and what you need to know here is that 60hz = 120 FPS output.
So the higher refresh rate the more FPS you gain to boost responsiveness and performance of both your game and mouse. So higher refresh rate is always better.
Back to the the Nvidia patch “NVIDIA Pixel Clock Patcher” which you can download right now from: http://www.monitortests.com/nvlddmkm-patcher-1.3.4.zip
Run nvlddmkm-patcher-full.exe > confirm the patch and restart your computer
This patch will allow you to add higher resolutions and refresh rates by removing the 165 MHz pixel clock limit for single-link DVI and HDMI. So this will work for people who have a monitor/screen plugged into their laptop or a desktop computer.
After patching you can add higher resolutions or higher refresh rates through Nvidia control panel or through this tool: http://www.monitortests.com/cru-1.2.4.zip
For AMD and ATI users use this patch:
ATI/AMD Patch: http://www.monitortests.com/atikmdag-patcher-1.3.4.zip
That is all Ladies and Gentlemen 🙂 Post a reply or contact me if you have further queries.









![[Fix] A running process may be interfering with the correct operation of AoE2 DE [Fix] A running process may be interfering with the correct operation of AoE2 DE](https://ageofnotes.com/wp-content/uploads/2023/07/A-running-process-interfering-with-AoE2-DE.jpg)

Thanks for 100% disk fix!!!! you genius man i search all youtube and find nothing.
another problem in voobly spectator it is very slow do you know why?
thank you
You are welcome! And I am happy that It was helpful to you.

Please try to disable all visual mods except small trees checked
the driver booster link seems to redirect to another product
Thank you for pointing the issue. I have updated the link to download only Game booster.